

Recently I have been doing quite a lot of material dedicated to shooting on the iPhone using Profoto pulsed light. In my opinion, this is a completely new stage both in the development of mobile photography and in the creation of advertising content.

In the new # ProLight issue, we will continue to work with Profoto A10 on-camera flashes in conjunction with the iPhone 12 Pro Max and dedicate it to taking pictures of a model in the interior. I decided to make this material, as I understand that the compactness and ease of work with this equipment will allow for cool content filming not only in studios. This will be possible in hotels, restaurants, apartments and other interesting locations, without complicating your life with a large amount of professional equipment. And to understand the intricacies of shooting on the iPhone is much easier than with the usual cameras. I am by no means claiming that cameras are no longer needed, but, in my opinion, for many tasks, the capabilities of smartphones, creativity and good lighting are perfectly sufficient.

Image: Ilia Kaygorod
Let me remind you that the proprietary Profoto application and a wireless Bluetooth connection are used to synchronize the pulsed light with the iPhone 12 Pro Max camera. This feature is available on all Apple smartphones starting with the iPhone 7, as well as some Samsung smartphones. Flash models that support Bluetooth sync are Profoto A10, B10, B10 Plus and dedicated C1 / C1 Plus mobile flash units. Since we are still talking about the advantages of compactness and portability of such a solution, today we will use the Profoto A10 on-camera flash and compact attachments.
The Profoto A10 camera flash is available for Canon, Nikon, Sony and Fujifilm cameras. The flash output is 76 Joules, and a single battery charge can produce about 450 flashes at full power. The main feature of the Profoto A10 is the round head shape and the modeling light built directly into the flash head. This makes the flash very similar to “adult” studio flashes, and the 76 Joules power allows it to work even in bright sunlight.
There will be no complex schemes in this material. I will tell you about the interesting basic points, which, by the way, are applicable not only when shooting on the iPhone, but also on “classic” cameras. All scenes will be shot using two Profoto A10 flash units, but with different light patterns. We will also work with shadow masks and color filters. Go!
First scene
So, in the first scene, behind the model there is a flash without any attachments and it is located quite far away. This is done in order to make the light as hard as possible, emphasizing the texture of the sofa, as well as to draw clear shadows from objects. It is important to note that the flash also partially illuminates the model, and the pink glass wall acts as a kind of flag. The flash is zoomed to about 50mm, which means the light stream is not very wide, which creates fewer reflections in the room. This gives us a lighted and partially colored background behind the model, which in turn is in shadow. Here’s what it looks like:

As you can see, there is also a lot of reflected light, but the model still remains insufficiently lit. Even this result is enough for me to illuminate it separately and separate it from the background. I will use a white Profoto XL reflective umbrella in conjunction with a diffuser to add the highlighting light to the model. This attachment will give me a fairly large and uniform spot of soft light, and when it is close to the model, it will also be quite contrasting.

Parameters: main module, 1/60, ISO 32. Two flashes – one behind the back, the other in front of the model with the Profoto XL umbrella.
The device is located just behind the model and is directed towards the camera. This is done to limit the light on the far side of the sofa and create shadows on the side of the model closest to us, which, in turn, further accentuates the backlighting.


Images: Pavel Molchanov
Initially, the light was applied to the pose of the model, in which she was leaning forward. Later, when she leaned back on the couch, the contrast on her face seemed insufficient to me, which had to be corrected by moving the device closer.
I want to point out that the large soft attachment can make it difficult for you to shoot dramatic scenes and portraits. This is especially true for small and / or bright rooms in which light is reflected and noticeably changes the contrast. In this location, a stripbox or softbox could also be suitable, and even with honeycombs, to illuminate the model with more contrast. However, by itself, the directional hard light approach for creating outlined boundaries of light and shadow for the background and soft light for the model I would leave.
Second scene
In the next scene, I decided to combine constant light and flash, starting with one device. The first thing to do is adjust the settings for the constant light. The Profoto app has all the controls you need to do this, as well as a setting display switch so you can immediately see the effect of constant light on exposure. This is how the constant light setting looked like:

Images: Pavel Molhanov
Now let’s add the main light to the model. Again, I will use a large white reflective umbrella as the key light. This attachment will allow me to shoot both large portraits and wider shots with even lighting on the model. I want to note that it is possible to use umbrellas of a smaller diameter, as well as silver ones, and in the light, and without a diffuser. They will give a different character of light, but the compactness of these attachments and their capabilities are familiar to all photographers firsthand. By the way, in one of the previous issues of # ProSvet, I talked about working with various reflective umbrellas.


Parameters: portrait module, 1/50, ISO32. Image: Pavel Molhanov
When “changing the lens” in the iPhone, there is a jump in exposure (due to different apertures of the modules), which must be taken into account by the shooting settings or the device. This, in my opinion, should be improved in the application itself – to automatically compensate for the shutter speed or ISO. However, if you shoot in RAW (which the Profoto app allows), then it will not be difficult to correct it later. It should be noted that the iPhone 12 Pro Max can shoot in the Apple ProRAW format, and shooting in this format is also available in the Profoto app.
Scene 3
Using the same location, I decided to take very different shots. For this, a second Profoto A10 source with a color filter came to my rescue. I started building the light with background lighting. I did not use any additional attachment for this device, except for the Clic color filter, since I wanted to get clear outlined shadows from the relief of the wall behind the model. This is how the light looked against the background without the key light on the model:

The flash works on the background without highlighting the model. Pavel Molhanov
Note that the reflected light from the wall and direct light from the fixture partially fall on the model’s face, creating bright colored reflections. This is a very important feature when working with background lighting and should not be neglected. Direct light from the fixture can be hidden by using curtains or flags, or even simply by changing the position along the beam of the fixture. By the way, this kind of light can be perfect for nude photography.
Next, I add a key light to the model, positioning it on the opposite side from the background source. This way I keep the most intensely colored areas. Since a large white umbrella has a very wide field of light, it hits the background, thereby removing color saturation from it. To avoid this, you need to place the device much closer to the model, or use another attachment, for example, a stripbox, softbox, honeycomb grids, and flags would also help.


Photos: Pavel Molhanov
Since the wall is painted with glossy paint, the reflected direct light creates a bright white spot, which is very attractive to itself, distracting from the model. This, again, could be removed by covering this area with a flag. But I decided to just change the angle a little and shoot larger portraits, especially on the white wall the color of the effective filter looked much more interesting, and the rhythm of the shadows cast on the wall seemed interesting to me.
I decided to work a little more with this location, namely, use the protrusions on the wall as a mask. Having partially hidden the model in the shadow of the protrusions, I illuminated the right side with the same hard source with a filter. Then, very close to moving the umbrella with the diffuser to the model, I got a soft, but contrasting lighting on it. Here it is worth noting that the umbrella is located horizontally along the beam and shines with a central spot on the model’s face. This allows you to create an interesting gradient in the background.
In the next location, I decided to very strongly separate the background and the model. For this, I used not only interior items, but also light. Again, a hard light with a color filter was chosen as the background fixture. This time I decided to use a red effect filter. Another important feature regarding background lighting was the use of a shadow mask on the wall. I used a plant pot as a flag.

The flash was mounted almost on the floor on a Joby gooseneck. This made it possible to shine from bottom to top and, together with a close location to the object, get a shadow that significantly exceeds the size of the object itself.
Scene 4

Photos: Pavel Molhanov
The painting light on the model was also not quite standard, despite the use of the same white umbrella. The umbrella was covered with half-pink translucent glass, which gave the color and partially changed the exposure of the device. The open part of the umbrella was slightly in front of the model and passed in passing, creating a separation of lighting on the model. And also the direct light of the background device partially fell on the model on the left. This approach resulted in very unusual and atmospheric images.
Next, I decided to experiment with exposure. In the settings of the Profoto app, I lengthened the shutter speed to work out the street lighting, but I did not like the result, since there was nothing interesting outside the window.
The mixed light shots were also quite simple, so I won’t focus on them.
Scene 5
In the final scene, I will use one of the most interesting key light techniques of this entire shoot. But I’ll start by exposing the fill light, which will also be colored with an effective Profoto Clic filter. The fill source will be a white reflective umbrella pointing vertically downward. The umbrella is positioned in such a way that it also creates shadows on the model’s face, but its main field extends only to the right side of the frame.


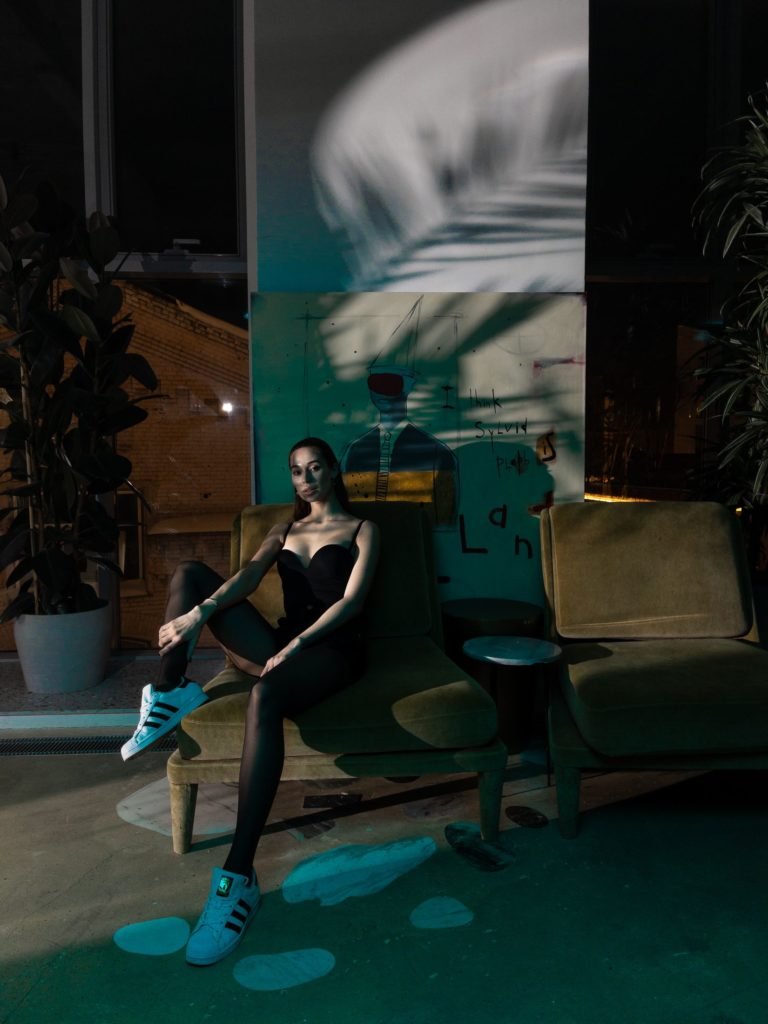
Photos: Pavel Molhanov
But as a drawing light, we will have a mirror, into which a flash is directed without a nozzle with a sufficiently focused beam. I placed a palm tree between the mirror and the model, which will act as a shadow mask. The light reflected from the mirror has a very clear border, which looks quite interesting. Thus, in some cases it is possible to create the illusion of direct sunlight. But it is important to note that such a hard light is not suitable for all types of faces and it is worth working with it very carefully.
Conclusion
As you can see from today’s photos, working with a camera flash in an interior can be very interesting. There are many ways how to diversify the picture using available tools and elements of the interior itself. We shot in the studio, of course, but in more natural settings you can find even more cool detail. Today I used an umbrella as the main and main light. This compact and affordable attachment allows you to get good results in a wide variety of shooting conditions. It should be repeated that there are even more compact and affordable umbrellas, which is especially valuable in the key of mobile photography and especially when shooting in a limited space of the interior.
— Interior portrait photography on iPhone —